
Construction, Architecture, Real Estate
The Best Rainwater Harvesting Systems in Modern Construction

Nov
Many people feel worn out by the rising cost of water. You may feel stuck each month as bills rise with no end in sight. You may worry each time you hear talk of dry seasons. You may feel lost when old pipes fail and supply drops without warning. This pressure builds over time. It eats away at your sense of comfort. It can even make your home or project feel less safe.
You are not alone in this. Many home owners, builders and site managers feel the same weight. They want to solve the problem but do not know where to start. They see rain fall in large storms yet watch it drain away unused. They sense that there is value in this water but lack a plan to capture it. They see new rules calling for better water use but get little clear help on what to do.
This can feel like trying to fix a leak in the dark. You know the problem is real. You know action is needed. You just need a clear path that works.
Now picture a world where that stress is gone. A world where each rainfall brings gain instead of loss. A world where your home or site stores clean rainwater that supports daily use. A world where bills drop instead of rise. A world where you feel in control instead of at risk. This world is within reach. It becomes real when you use a well planned rainwater harvesting system.
Rainwater harvesting lets you turn a simple rain event into a source of comfort. It can support your home. It can support your landscape. It can support your future. And with the right design from the start it blends into modern construction with ease.
The New Vision for Water Smart Buildings
Many people dream of a place where water stress no longer shapes daily life. A place where each drop of rain brings real value. A place where buildings think about water the same way they think about light, safety and comfort. This is the new vision that guides modern sites. It is simple. It is calm. It is clear. And it is something any home or project can reach.
Picture a building that works with nature instead of fighting it. The roof collects clean water on its own. The walls help guide flow to storage. Tanks sit in smart spaces where they blend with the structure. The system works quietly in the background. You do not need to watch it every day. It runs on its own with steady results.
This vision offers freedom. You depend less on strained public supply. You gain more control over your own resources. You use rainwater for gardens, cleaning, toilets and more. You save money without losing comfort. You reduce stress on public pipes that already work past their limit.
A rainwater smart building also feels better to live in. It feels modern. It feels prepared. It feels thoughtful. You know the building is doing its part to care for the site and for the people who live or work there. It meets new rules for water use without forcing you into complex habits.
The shift toward water smart design is not a trend. It is a response to real pressure. Rainfall is strong in many places yet most of it is lost. At the same time water demand rises. A smart building sees this gap and fills it with a clear plan. It captures water at the right time and stores it for the right use.
This vision changes how people think about roofs, facades and landscapes. These parts of a building are more than looks. They can help collect and save water. They become active tools that help the building stay ready for the future.
When you look at a water smart building you see more than design. You see hope for a calmer, safer and more steady way to live. It shows what is possible when a building works with the rain instead of letting it slip away.
Rainwater Harvesting System Design Architecture
Rainwater harvesting works best when it starts at the design table. Many people try to add a system after the building is done. This often leads to poor flow, weak storage and higher cost. When architects plan the system early the whole process becomes smooth and clear.
Architecture guides how water moves across a site. Roof shape, slope and size all affect how much water you can collect. Walls and facades shape how rain falls and slides. The ground level tells you where tanks can sit without risk. Good design brings all these parts into one story.
An architect looks at the building as a whole. They study how rain hits the roof. They map how it will run during a light shower or a strong storm. They look for points where leaves or dirt might gather. They plan straight flow paths so water can move fast and stay clean. They avoid sharp turns that slow water or let dirt settle.
Early design also gives room for smart tank placement. Tanks need shade. They need strong support. They need space for filters and pipes. When tanks are planned from the start they blend into the site. They may sit under stairs, behind walls or in shared service areas. They stay out of sight yet easy to reach for care.
Design architecture also sets the tone for beauty. A rainwater system does not need to look like a rough add on. Architects can hide gutters inside the roof edge. They can shape facades that guide water with clean lines. They can match tank colors with the building look. This makes the system part of the design rather than a random piece.
Smart design uses gravity whenever possible. Gravity moves water without power. It reduces cost and cuts stress on pumps. Sloped roofs send water straight to filters. Downpipes guide it to tanks with steady speed. When design uses gravity well the system becomes simple, strong and low cost to run.
Architects also work with engineers to size each part. They match roof area with tank volume. They choose gutters wide enough for storms. They set safe overflow paths. They plan where excess water goes without harm. This planning keeps the building safe even in heavy rain.
When the system is shaped by good design at the start it lasts longer and works better. It becomes a natural part of the building. It saves water each year with little effort. It supports the people who use the site. It prepares the building for a future where smart water use is not a choice but a need.
Rainwater Collection Design Basics
Rainwater collection works best when the design stays clear and simple. Many problems start when water is forced through routes that slow it or block it. A strong design makes water move in a clean, steady line from roof to tank. Each part works with the next. Nothing feels forced or rushed.
The first basic rule is smooth flow. Water should not twist or loop as it moves. Sharp turns trap dirt. Long flat runs slow water and let debris settle. A clean slope keeps water fast and fresh. Good design keeps gutters straight and direct. Downpipes drop water without long delays.
The second rule is clean entry. Leaves and dust gather on roofs. Filters and screens are key. They catch dirt before it gets close to the tank. This keeps water clear and reduces care work. When filters sit in the right place they stay easy to clean.
Roof to tank planning shapes the heart of the system. The size of the roof sets how much water you can collect. The slope sets the speed. A steep roof sends water fast. A gentle roof needs wider gutters to handle flow. Every choice should match the rain levels in the area.
Tank placement also matters. The tank should sit close to the downpipe so water does not travel far. A short route keeps water clean. It also lowers the chance of leaks. Tanks should sit on firm ground and stay in shade when possible. Shade controls heat so water stays fresh.
Overflow planning is another key step. Tanks fill fast in heavy rain. If overflow lacks a safe path, water can damage the building. A safe overflow leads water away from the site. It protects the tank and the structure.
Last, the system must stay easy to reach. Good design places filters where you can clean them without strain. It keeps inspection points in open spots. It avoids hiding key parts behind walls or tight spaces.
When the design follows these basic rules the system becomes strong and reliable. It does not struggle in storms. It does not gather dirt. It does not burden the owner. It simply works. The result is clean rainwater ready for safe use in daily life.
Rainwater Harvesting Facade Concepts
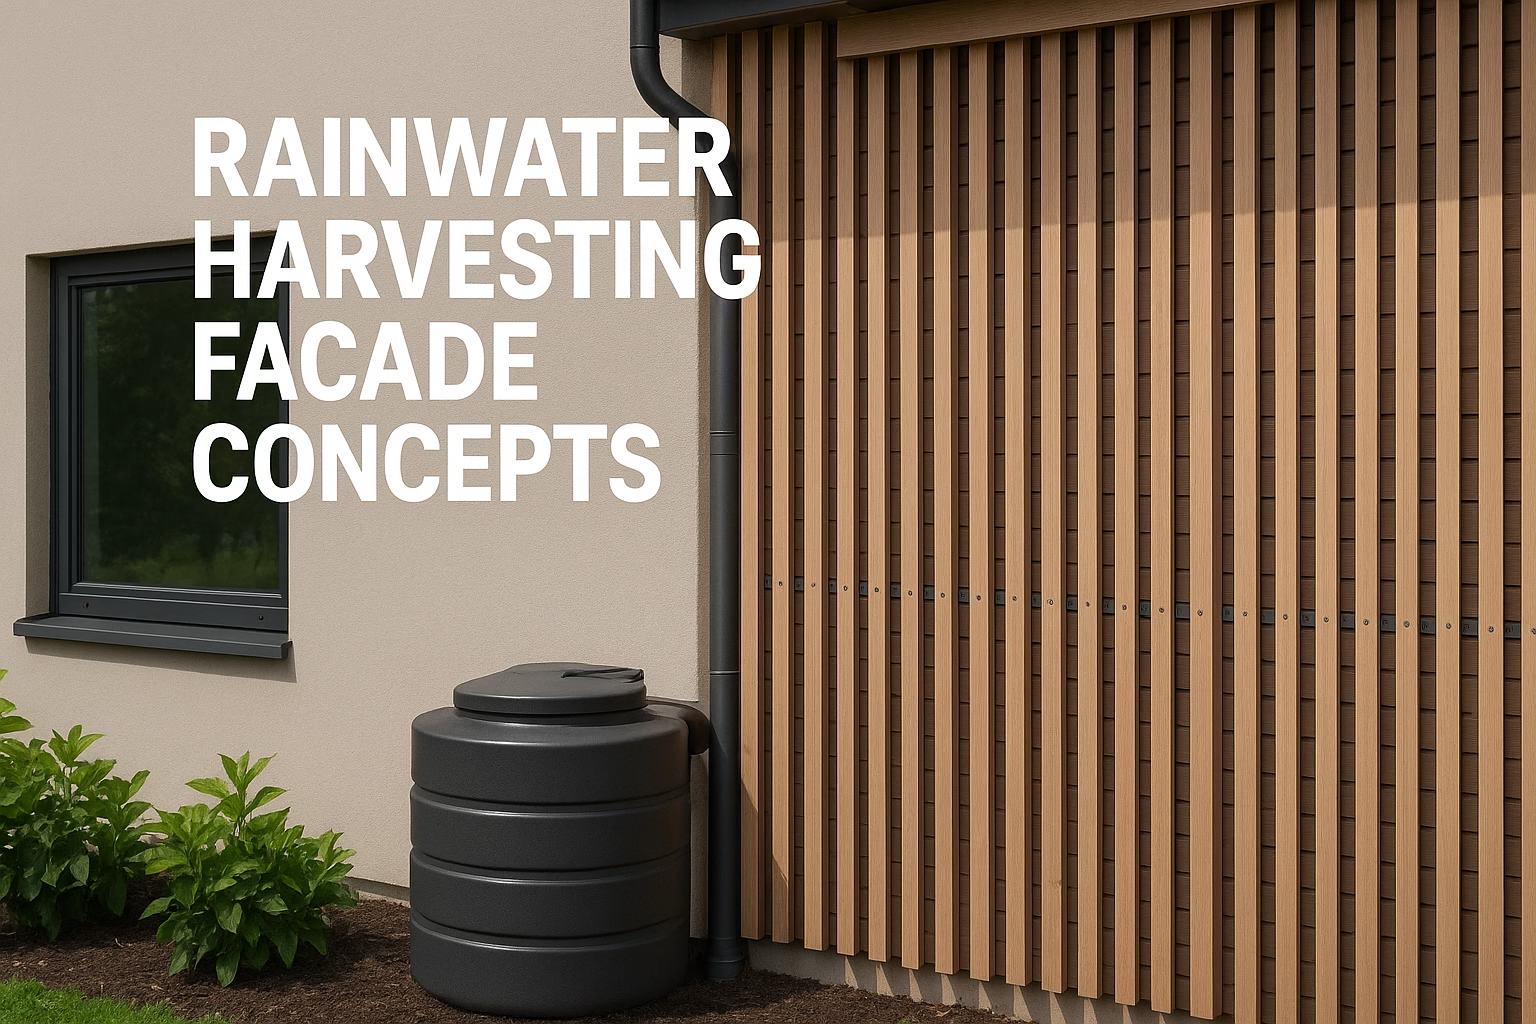
Many people think rainwater collection starts and ends at the roof. Yet modern design shows that walls and facades can play a major role. A building face can guide water with the same ease as a roof when shaped with care. This idea opens new paths for sites that lack large roof areas or want to boost total water gain.
A rainwater harvesting facade is more than a wall. It becomes an active surface. Sloped panels help guide water. Smooth cladding lets water slide with little loss. Hidden channels run behind the skin of the building to move water downward. Each part works quietly. You may not even notice it at first glance.
The goal is simple. Catch as much clean water as possible without harming the look of the building. Architects study how rain hits the facade. They watch where drops gather and where streams form. With this knowledge they shape panels that help water move in the right path. This keeps flow steady and helps protect the wall.
Some facades use special materials that resist dirt. These surfaces stop mud from sticking. They keep water clean and reduce care work. Other designs use vertical fins that guide rain toward small gutters built into the wall. These gutters hide well yet bring strong results.
Water collected from the facade moves into a shared system. It joins water from the roof before passing through filters. The design ensures the flow stays clean and controlled. It avoids pockets where water can pool or stain the wall.
A rainwater harvesting facade also adds beauty. The lines of the panels can create a calm, modern look. Light plays well on smooth surfaces shaped for water. You get a design that feels fresh and smart. People see a clean facade but may not guess it also collects water.
This concept helps sites where space is tight. Some buildings cannot place large tanks near roof downpipes. A facade system gives them more ways to reach needed volume. It works well in dense areas where every drop counts.
When planned with care, a rainwater harvesting facade becomes a natural part of the building. It supports clean water gain. It eases pressure on the roof system. It adds value without adding clutter. It shows how modern design can turn simple walls into useful tools for the future.
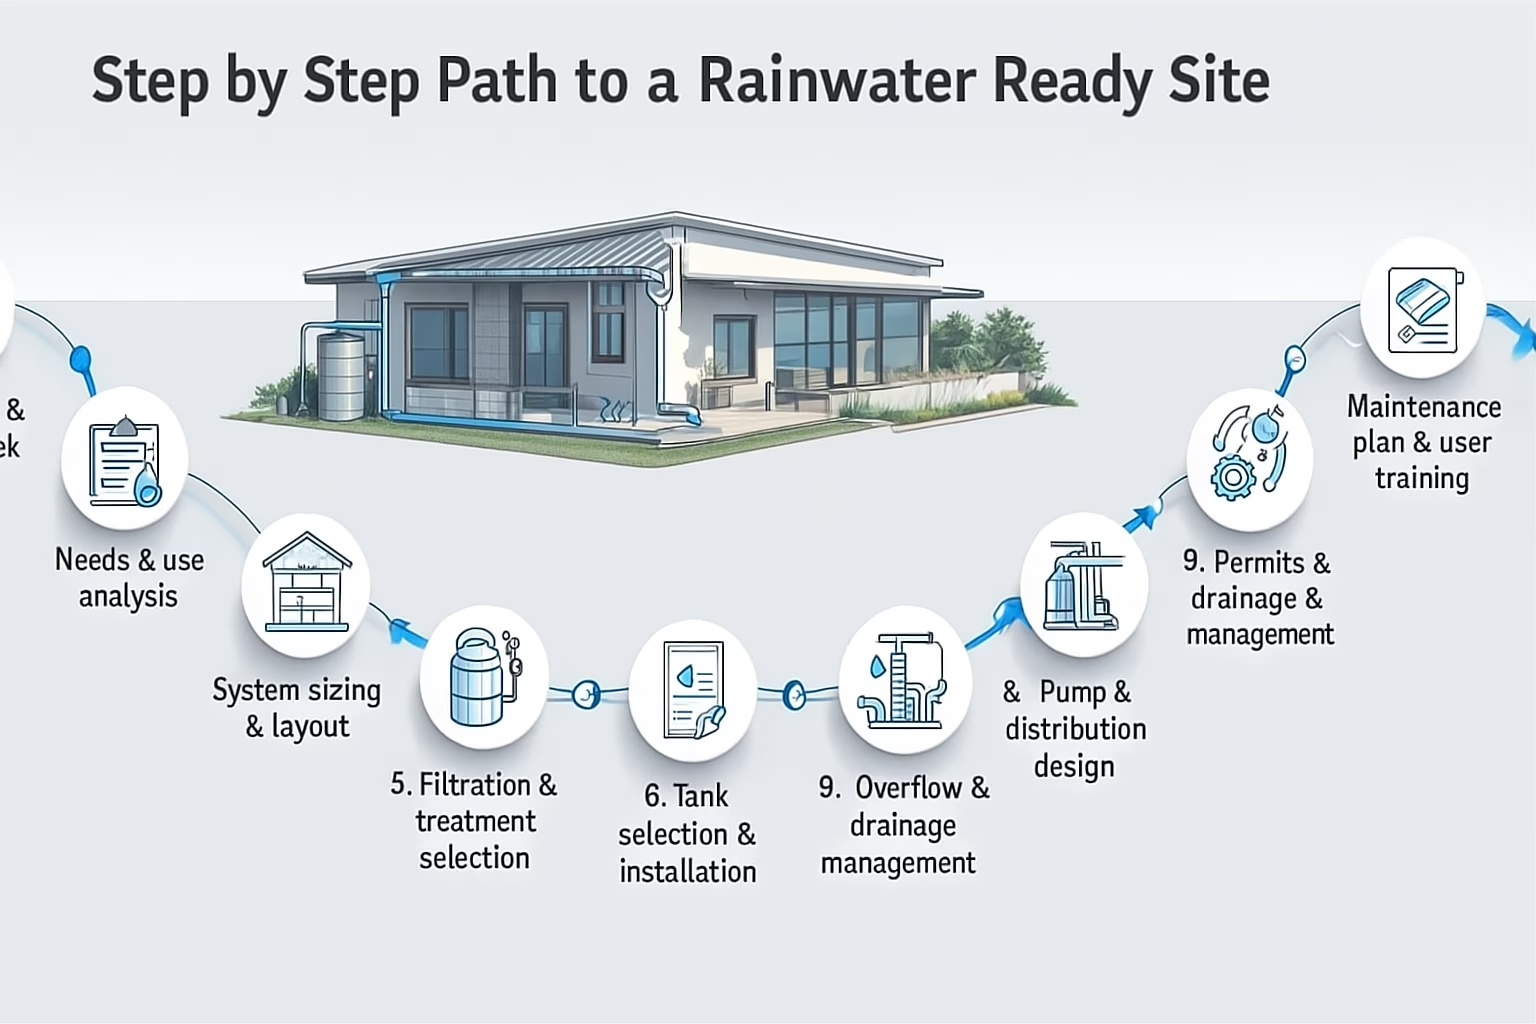
Step by Step Path to a Rainwater Ready Site
Turning a site into a rainwater ready place is simple when you follow clear steps.
You do not need to guess. You can follow a proven path that keeps risk low.
Below is a step by step route you can use now. Each step is practical and clear.
1. Site study and data check
Start with local rain data and roof size. Know how much rain you get each year.
Measure roof catchment area. Note slopes, valleys and roof material.
Map where water naturally flows across the site. Look for low points.
Check soil type and ground bearing for tank siting. Soft soil needs extra care.
Mark access points for trucks and for future maintenance and cleaning.
Record trees and debris sources that might raise filter needs.
2. Needs and use analysis
Decide what you will use the water for. List uses like toilets, washing and gardens.
Estimate daily and seasonal demand. This guides tank size and pump needs.
Decide how much backup you need when rain is low. That affects storage volume.
Set quality needs. Drinking water needs higher treatment than garden water.
3. System sizing and layout
Match roof catch area to tank volume with local rain data. This avoids wrong sizing.
Pick tank location near downpipes to keep pipe runs short. Short runs keep water cleaner.
Plan filter and first flush units near the roof outlet. They protect the tank.
Choose overflow routes so excess water flows away from the building.
Add an emergency bypass for heavy storms to protect the system.
4. Roof, gutter and downpipe design
Use smooth gutters with the right width for storm flows. Narrow gutters clog fast.
Place leaf screens and gutter guards where needed. They cut routine cleaning time.
Slope gutters correctly so water moves quickly to downpipes. Standing water breeds dirt.
Use sealed downpipe joints to avoid leaks and pest entry.
5. Filtration and treatment selection
Install a first flush diverter to discard the initial dirty flow. This protects tank water quality.
Choose mesh or cartridge filters for coarse debris removal. Match filter size to flow.
If you plan to use water for drinking, add UV or chemical treatment. Follow local rules.
Make sure filters are easy to access and clean.
6. Tank selection and installation
Pick the right tank material for the site and use. Concrete, plastic and metal each have pros.
Set the tank on a firm, level base that will not settle. A settled tank can leak.
Provide secure lids and vents to keep water safe and reduce algae growth.
Install inspection access points for quick checks and cleaning.
7. Pump and distribution design
If you need pressure, choose an efficient pump sized for your outlets.
Place the pump near the tank to reduce suction lift issues.
Add a pressure tank or controller for steady supply and less pump cycling.
Plan manual shutoffs to isolate the system during service or storms.
8. Overflow and drainage management
Design overflow paths that direct water away from foundations. Avoid pooling near the building.
Consider soakaways or green swales to use overflow in the landscape. This reduces runoff damage.
Add visual markers and access to overflow points for easy checks.
9. Permits, testing and safety checks
Check local rules for water reuse and plumbing changes. Get permits early.
Run a full system test after installation. Check flow, filter function and pump pressure.
Test water quality to confirm it meets your chosen use. Keep records for compliance.
10. Maintenance plan and user training
Set a simple maintenance schedule for gutters, filters and tank checks. Regular care keeps costs low.
Train users on basic checks and safe use of the rainwater supply. Clear instructions prevent misuse.
Keep spare parts like filters and pipe seals on hand for quick fixes.
11. Handover and documentation
Provide a clear handover pack with as built plans, maintenance notes and supplier contacts.
Label shutoffs and key points on the site so anyone can act in an emergency.
Offer a short follow up inspection after three months to tune the system.
How Nyolenju Structures Limited Helps
Nyolenju Structures Limited guides each step. The team shapes smart designs. They study your site. They plan the best flow path.
They build and install with care. They pick strong parts. They check all links.
They give long term support. You get help when you need it. You get peace of mind.
Final Thoughts
Rainwater harvesting solves real pain. It cuts waste. It brings peace. It makes a site ready for the future. You can take the next step with confidence.
What would change for you if water stress ended for good?
Reach out to Nyolenju Structures Limited to plan your rainwater smart site and gain control over your water use.
FAQs
1. How much rainwater can a home collect?
It depends on roof size and rain levels. Many homes gain more than they expect.
2. Is rainwater safe to use?
Yes. With filters and clean tanks it stays safe for many uses.
3. Can rainwater systems work on flat roofs?
Yes. With slight tilt and good drains it works well.
4. Do rainwater systems need power?
Some use pumps. Many use gravity to cut power needs.
5. How long do tanks last?
Good tanks last many years with simple care.